Automating Deployments to Production and Staging with GitHub Workflows

While preparing for my final project which is approaching slowly this winter, I wanted to be sure that during the development of the project, I wouldn’t struggle with deployments to both testing and production environments, while stressing about writing application code.
So here’s my example of how I navigated this problem and built a deployment workflow in GitHub Actions that can auto-deploy to multiple environments within a single file.
Very early in my research, I found this repository from Azure, that focuses on Terraform commands and configurations tailored for Azure, which allowed me to focus on building the workflow logic to deploy my applications. The project is built in a mono-repository structure containing infrastructure, frontend, and backend code.
Repository Global Actions
I started by building two actions for my workflow. The first action identifies the changed part of the repo, and the second determines the deployment environment.
I would have liked to make these actions dynamic and deploy them to the Github Actions Marketplace, but at this point in time (October 2023) Github Actions doesn’t support dynamic outputs — which makes it hard to make them globally usable, so for now they live in each of my repos.
Check Changes Action
This action is pretty simple, I've defined the different folders in the repository and then I check the latest commits and utilize git diff to see if there are any changes in a given folder.
name: 'Check Changes'
description: 'Check if there are changes in specific directories'

outputs:
  backend_changed:
    description: 'Is backend changed?'
    value: ${{ steps.changes.outputs.backend_changed }}
  frontend_changed:
    description: 'Is frontend changed?'
    value: ${{ steps.changes.outputs.frontend_changed }}
  infrastructure_changed:
    description: 'Is infrastructure changed?'
    value: ${{ steps.changes.outputs.infrastructure_changed }}

runs:
  using: "composite"
  steps:
    - name: Check for changes
      id: changes
      run: |
        backend_changed=false
        frontend_changed=false
        infrastructure_changed=false

        git diff --quiet HEAD^ HEAD backend/ || backend_changed=true
        git diff --quiet HEAD^ HEAD frontend/ || frontend_changed=true
        git diff --quiet HEAD^ HEAD infrastructure/ || infrastructure_changed=true

        echo "backend_changed=$backend_changed" >> $GITHUB_ENV
        echo "frontend_changed=$frontend_changed" >> $GITHUB_ENV
        echo "infrastructure_changed=$infrastructure_changed" >> $GITHUB_ENV
      shell: bash
(Direct link to the file: .github/actions/check-changes/action.yml)
Set Environment Action
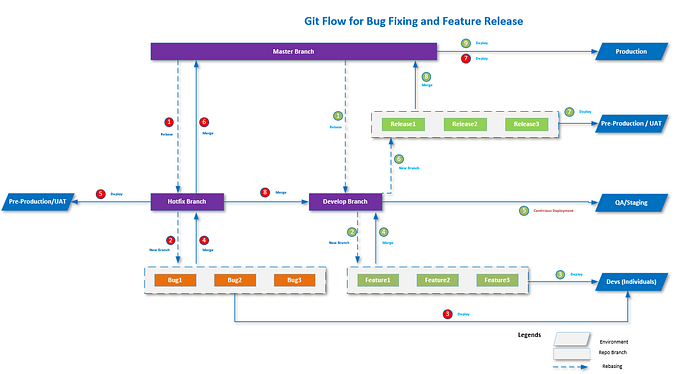
This action figures out what environment the deployment workflow should deploy to either the production or staging environment.
The main and development branches are used for the two environments. And if it’s a pull request we don’t want to deploy but we still want the Terraform Plan to execute if there have been changes to the Terraform code in the infrastructure folder. This allows Terraform to discern the environment against which it should compare the configurations.
name: 'Set Environment'
description: 'Figure out which environment to deploy to'

outputs:
  environment:
    description: 'Environment to deploy to'
    value: ${{ steps.environment.outputs.environment }}

runs:
  using: "composite"
  steps:
    - name: Set Environment
      id: environment
      run: |
        BRANCH_NAME=""
        if [[ "${{ github.event_name }}" == "pull_request" ]]; then
          BRANCH_NAME=${{ github.base_ref }}
        else
          BRANCH_NAME=${{ github.ref }}
        fi

        if [[ "$BRANCH_NAME" == "main" || "$BRANCH_NAME" == "refs/heads/main" ]]; then
          echo "environment=production" >> $GITHUB_OUTPUT
        elif [[ "$BRANCH_NAME" == "development" || "$BRANCH_NAME" == "refs/heads/development" ]]; then
          echo "environment=staging" >> $GITHUB_OUTPUT
        else
          echo "Unknown branch name: $BRANCH_NAME"
          exit 1
        fi
      shell: bash
Direct link to the file: .github/actions/set-environment/action.yml
Deployment Workflow
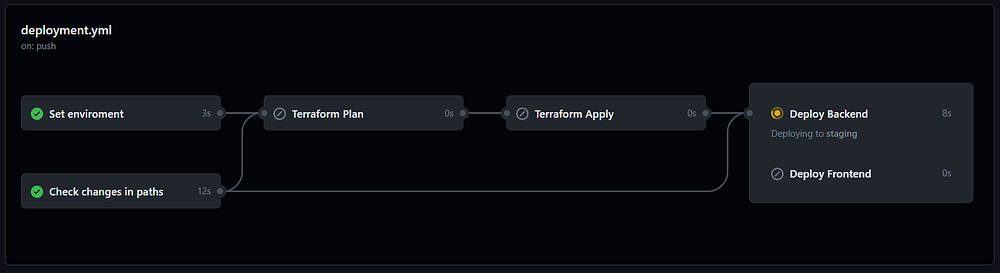
Next, let’s explore the deployment.yml file, which orchestrates the entire deployment flow, following a quick overview of the actions stored in my repository.
First Step: Check Changes
We start our journey with the first step, invoking an action that scans for changes in paths, enabling us to steer our workflow effectively downstream. Take a look below at how this job is working:
  check-changes:
    name: Check changes in paths
    runs-on: ubuntu-latest
    outputs:
        backend_changed: ${{ steps.check-changes.outputs.backend_changed }}
        frontend_changed: ${{ steps.check-changes.outputs.frontend_changed }}
        infrastructure_changed: ${{ steps.check-changes.outputs.infrastructure_changed }}

    steps:
      - name: Check changes in paths
        id: check-changes
        uses: malpou/automatic-deployment-workflow/.github/actions/check-changes@main
Next Up: Set Environment
Moving on, our next action is important in determining the environment to deploy to, ensuring our deployment is accurately targeted. Here’s how this action is invoked:
set-environment:
    name: Set environment
    needs: check-changes
    runs-on: ubuntu-latest
    outputs:
      environment: ${{ steps.set-env.outputs.environment }}

    steps:
      - name: Set environment
        id: set-env
        uses: malpou/automatic-deployment-workflow/.github/actions/set-environment@main
Terraform Plan: A Crucial Step
Progressing forward, the terraform plan the command is run, this step is borrowed (and modified slightly) from the terraform-github-actions repository, which has been the main inspiration for this venture.
I took the liberty to modify how I configure the Terraform backend to identify the correct state file of the environment in focus. It’s accomplished by operating in a step where backend configuration files, such as backend-staging.tf-ignore and backend-production.tf-ignore, are manipulated to plan against the accurate state file, dependent on the environment we are getting higher up in the workflow.
Here is how I get the correct backend configuration:
    - name: Configure Backend for Environment
      run: |
        cd infrastructure
        cp backend-${{ needs.set-environment.outputs.environment }}.tf-ignore backend.tf
While dealing with “backend”, it’s pivotal to understand its essence, particularly for those unacquainted with Terraform. It specifies the state’s storage location, a crucial element in managing our infrastructure’s evolving state.
Here is the backend configuration file for the production enviroment:
terraform {
  backend "azurerm" {
    resource_group_name  = "automate-rg"
    storage_account_name = "automateterraformbackend"
    container_name       = "tfstate-prod"
    key                  = "terraform.tfstate"
  }
}
Diving a bit deeper into the “terraform plan” command, it’s instrumental in creating an execution plan, and identifying actions necessary to achieve the desired state defined within the configuration, without applying these changes. Essential for identifying discrepancies between the actual environment state and our configuration, it provides a safety check, ensuring our changes are legitimate and resulting in the desired outcome.
Terraform Apply, Deploy Backend, and Deploy Frontend
We then pave our path through the terraform-apply step, where, if planned in the preceding step, Terraform applies the infrastructure changes. This step, untouched, retains the original code from the example repository.
Moving into the deploy-backend step, it’s crucial for deploying the .Net Function App and only springs into action if changes are noticed in the backend directory or if the terraform-apply job has been executed.
Lastly, the deploy-frontend job, while mirroring the deploy-backend job in function diverges in focus. Rather than a .Net Function App, it’s a Svelte SPA that is deployed to a Static Web App.
Result
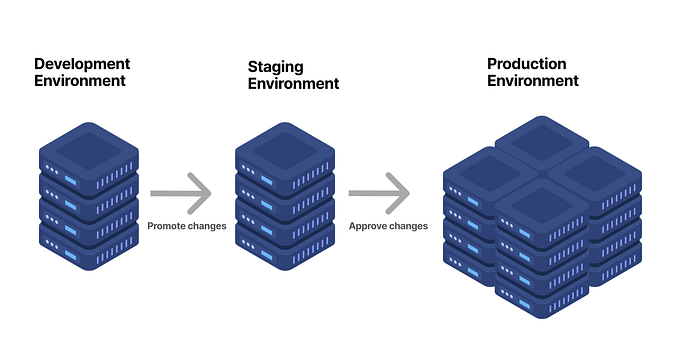
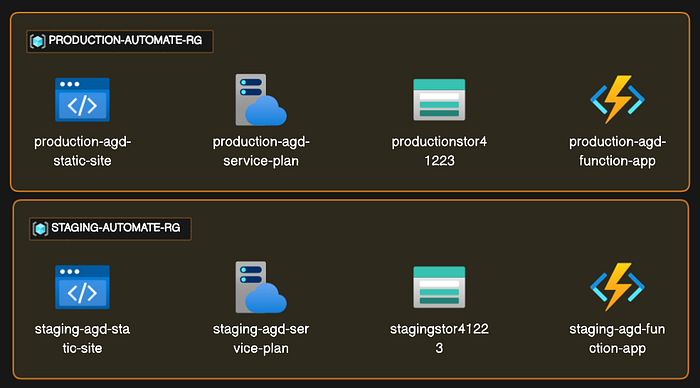
Delving into the outcome of this procedural example, Azure will host 2 twin resource groups, each equipped with the same resources but assigned to distinct environments.
When code changes — originating from updates to the production or development branch — occur in either the frontend or backend, the corresponding environment is automatically updated.
This alignment between branch and environment ensures smooth, hassle-free deployments subsequent to the initial workflow setup. Below, you’ll find an image illustrating the resultant architecture in Azure crafted by this example.
So, once this workflow is in place, developers can focus solely on coding while the CI/CD pipeline autonomously manages the deployment aspect in the background, ensuring consistent and timely updates to the relevant environments.
Here is an image of the architecture in Azure built by this example:
Repo
To dive deeper into this setup, feel free to explore the complete source code available in the repository: automatic-deployment-workflow.
If you have any questions or problems in regards to the workflow don’t hesitate to contact me.